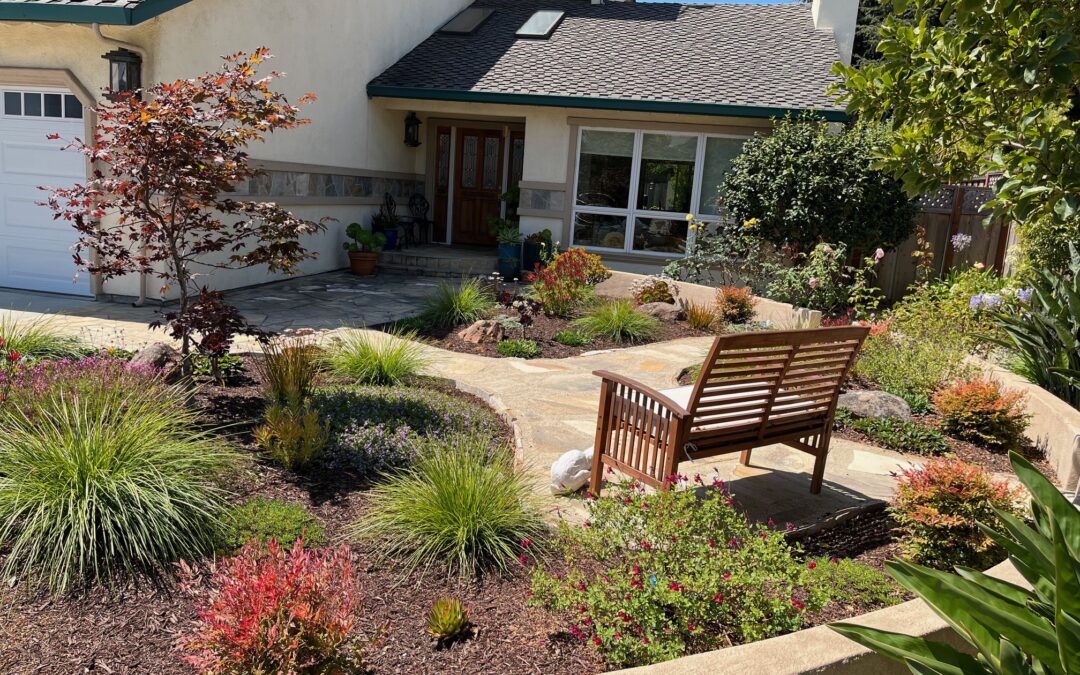
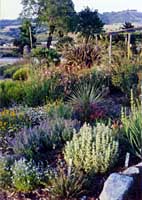
 While working at the Sierra Azul Garden and Nursery, a comment often heard from customers and visitors is, “We’d like to take one or more of these beautiful mounds and move them over to our property.” Creating a Mediterranean Mound using a variety of appropriate plants combined with a water-conserving irrigation system to produce year round color, contrast and textural beauty is a rewarding experience. Besides the plants, other materials are involved, including: the mound soil, boulders, mulch, and an irrigation system. The mounds at Sierra Azul are generally large, based on the size of our two-acre garden. In the text below we give you the recipe for a smaller sized mound that will be effective for most residential lot gardens or in a lawn replacement project where multiple mounds will likely be used.
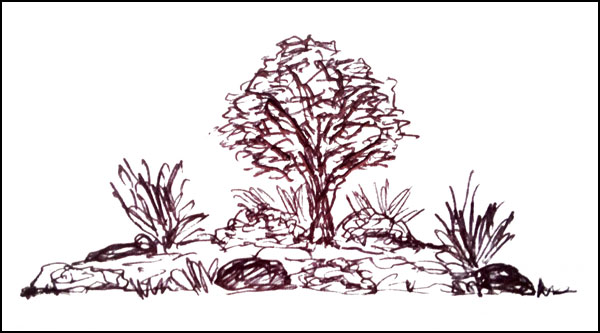
To begin planning the mound it is important to consider overall dimensions and whether the mound will be viewed from all sides or predominately one side, as if the area is up against a fence, wall or border of tall shrubs. The mounds at Sierra Azul are viewed from wide paths that border them on all sides. This shows off the elevation of the mounds and allows the effective use of smaller, less cumbersome boulders that can be arranged toward the edges of the mounds in a circular or elliptic fashion. The use of boulders adds textural interest and also creates pockets or highlighted areas for choice plants.
A good dimension for an attractive mound is 8-10‘ wide by 12-16‘ long. Smaller is fine but more consideration will be necessary in choosing plants that won’t become overcrowded. If space is not a concern as when you are removing a lawn, multiple mounds can be created in groups of varying sizes and shapes with paths in-between as needed for access and design balance.
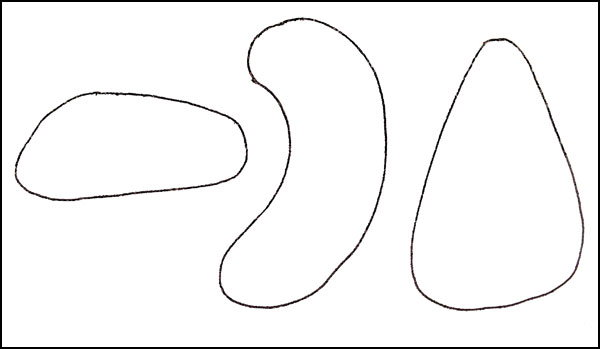
To create a 8’x12′ mound that is 16-18“ high, 1.5-2 cubic yards of soil will be needed. Shapes can be in the form of an oval, kidney, or a broad tear-drop, and the height should gradually taper from the center to the edges.
A topsoil or garden mix planting blend for the mounds cost $36-40 a yard at the local landscape supply yards. If soil can be moved from another part of your property, some of this expense might not be necessary. The native soil underneath the mound can be roto-tilled or hand-spaded if it is too compacted before the new mound soil is dumped and spread. Emerging weeds or grasses will be smothered, with the exception of bermuda grass (crabgrass), bindweed and sheep sorrel, which should be sprayed with systemic herbicide, two weeks in advance of the mound creation. Cardboard can be used as a barrier under the mound to help suppress weed growth. It can be economically purchased in 3-4’ wide rolls at a local bulk paper supplier such as Coast Paper in Santa Cruz.
After the mound has been raked for basic shape and height, it’s time to place the boulders. Keeping a conservative budget in mind, 100- to 200-pound boulders can be very effective in adding another dimension to the mound, but not be so large as to necessitate the expense or use of heavy-duty moving equipment. Figure on using 3-4 boulders for an 8’x12′ mound. (The drawing below shows more, but with multiple mounds, 2-3 per mound is plenty.) Prices at the local rockery will vary from $200 – $300 per ton, depending on the rock type.
The boulders at Sierra Azul are gray granite, which gives a high contrast to the green of the plants and they are the least expensive of the different kinds available locally. For a darker earthtone, fieldstone is popular. Gold granite is another option. Most pickup trucks can handle a ton of boulders, then back up close to the mound to unload. A sturdy wheelbarrow or furniture dolly can easily haul a 100- to 200-pound boulder.
Arrange the boulders in an uneven circle around the perimeter of the mound, some in pairs or groups. Keeping the boulders to the outside mound will show them off, and they will be less likely to be overgrown by larger plants in the interior area of the mound. Make sure to dig depressions before setting the boulders into place. This makes them look more natural than if plopped on top of the soil.
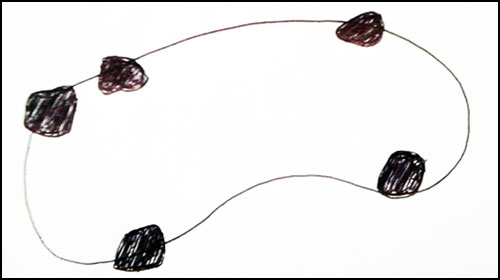
A tip from a rock-savvy landscape contractor is to align the longest sides or faces of all the boulders in the same parallel plane, so they appear to have been uplifted and exposed in nature. Once the boulders are arranged, a more refined raking and shaping of the mound can be very inspirational. This part of the creative process might conjure colors and images of special plants to use in the spaces and pockets the boulders have created. We can help you with that part: if you want something spike or soft, wide or tall, we know some plants you will love.
Now that your mound has been shaped and raked with the boulders solidly placed, the plants are chosen and laid out. Small trees, shrubs or tall perennials (4’+), should be placed near the center section of the mound; medium height shrubs and perennials (3′-4′) in the mid-sections, diminishing to lower growing perennials (under two feet all) and ground covers near the edge. Textural plants such as grasses or sword-leaved specimens can be used near the boulders for focal accent points. This kind of layout will give the mound a layered or tiered effect, carrying the eye upward to the center of the mound where the taller shrubs and perennials or a small tree will create a focal area as well as the accents from textural plants in relationship to the boulders. This layout will also help to prevent a larger growing plant from obstructing its more compact or lower growing neighbors.
Larger shrubs or smaller trees to choose from might include: shrubs Manzanita (Arctostaphylos pajaroensis, Arctostaphylos ‘Dr. Hurd’, ‘Sentinel’, ‘Monica’), Grevillea (‘Superb, ‘Bonfire’, ‘Ivanhoe’), Leucadendron (‘Red Gem, ‘Wilson’s Wonder’) or Purple Smoke Bush (Cotinus ‘Royal Purple); trees: Arbutus ‘Marina’, Purple Leaf Japanese Maple (Acer palmatum ‘Bloodgood’) or Forest Pansy (Cercis canadensis purple). Suggestions for mid-section plants are: perennials: Border Penstemons (Penstemon gloxinoides of varying colors), Autumn sage (Salvia greggii, microphylla or S. grahamii types), Jerusalem Sage (Phlomis), or Euphorbias; shrubs: Leucadendron (‘Blush’, ‘Winter Red’) Rockrose (Cistus ‘Sunset’, ‘Santa Cruz’), gray or green Santolina, Rosemary (Rosmarinus ‘Mozart’, ‘Ken Taylor’), Lavender (many forms: Lavandula vera, intermedia, stoechas varieties), Australian Fuchsias (Correa species and varieties) and Manzanitas (Arctostaphylos hookeri varieties).
Low-growing plants for the outward areas of the mound could include combinations of: Verbenas (low forms with several color choices), Erigerons (several varieties of daisy), California fuchsia (Zauschneria low forms), Sunrose (Helianthemum – many colors available), Manzanitas,(Arctostaphylos low forms), Australian Straw Daisy (Chrysocephalum) and Myoporum parvifolium (Pink flowering or Red Leaf – both are very low).
Smaller forms of Phormiums and Cordylines (color forms of compact New Zealand flax and palm-lily), Cape Rush (Chondropetalum) and Ornamental Grasses (Stipa, Carex, Festuca, Miscanthus, Muhlenbergia) add textural interest and work well as contrasting plants near or behind boulders depending on their size, while different Succulents (Crassula, Echeveria, Sempervivum, Sedum), Thymes (lots of varieties) and Ornamental Oreganos are appealing plants in between and around boulders.
Consideration should be given to the mature size of plants as well as to their year-round appeal. Texture and form are as important to a design as flower color, especially as flower color is generally not a constant feature. Perhaps one-half of the plants should be chosen for their year-round appearance, while the balance of plants can be selected for seasonal color. Another design consideration is choosing complementary colors of both flowers and foliage, though color clashes in plants are more forgiving than in other situations. Finally, when selecting plants, especially for a small area, be careful not to select a plant “bully” which will overgrow your other plants.
Actual planting will be easy as the soil has just been amended with the new mound material. In this newly amended soil it is not necessary to dig a large hole for the plant—a hole just a little larger than the container is sufficient. If the soil is particularly dry away, the hole can be filled with water and allowed to drain before putting the plant in. Plants with tight root balls should have the roots loosened, otherwise don’t disturb the roots of your new plants. If it’s necessary to cut a lot of roots, such as with an older root-bound plant, the top of the plant should be pruned as well, proportionally . When filling in soil around the root ball, try to eliminate air spaces: these can cause the roots to dry out even though underground. The soil level around the plant should be kept the same as it was in the container with a small circular dike (like a saucer) formed around each new planting. Newly planted plants should be watered well by hand with a soft flow to help eliminate small air pockets and establish a water balance between the root ball and the soil. Plants will need shorter watering intervals for the first two-three weeks to make sure they do not dry out after being placed in your garden.
During the planting process, the use of a fine finished compost or planting mix will encourage faster root growth with greater soil water retention and aeration if new mound soil has not already been brought in. With the new mound soil, planting mix is not necessary in the mounds—and the mound mix can be used for plants outside the mounds if needed. A basic organic granulated/powder fertilizer like Dr. Earth or Happy Frog, or a basic type of 12-12-12, used in small amounts, (1-2 tsp. for smaller plants, 1-2 Tbsp. for the larger plants) mixed with the planting soil or used later as a top dress, will insure basic nutrients are provided for initial root and top growth. For members of the Protea family, the above fertilizers should not be used and replaced with Ironite (1-0-1 plus minors). As deeper rooting occurs, supplemental fertilizer may not be necessary, although once a year fertilization during the late rainy season (February – March) is a good rule of thumb to keep the plants thriving.
Drip irrigation is a simple, effective, and economical way to provide water for plant growth during the dry season months. Flexible black plastic, 1/2″ drip-tubing can be snaked back and forth in a serpentine fashion on the mound and held down with 6-8″long, heavy wire garden staples. One gallon/hour drip emitters are plugged into this main line next to adjacent plants (within a few inches) and almost all the plants should be able to be provided drip emitters on the main 1/2″ line with 1/8″ spaghetti tube used sparingly as needed, tapped into the main line for harder to reach or future added plants. Bigger plants normally take a second emitter, while trees can take a third one, or a couple of 2-gallon/hour emitters.The drip system can be hooked up to a hose-bib with a hose-end fitting or plumbed into the water line before the hose-bib with a separate shut off valve. Special sprinkler adaptors can be used in one to several places to replace former lawn sprinklers that have filters and pressure regulators inside. Other abandoned lawn sprinklers will be capped off under the soil surface. Existing lawn electric valve controllers can be re-utilized in this system. If needed, battery powered portable time-clocks combined with a filter and pressure regulator can easily be installed at the source of water if hose-bibs are used as the drip system water source.
During the dry season, the drip system watering schedule should be approximately 1-1.5 hours every week (twice a week—30-45 minutes—for the newly planted mound for the first three weeks), depending on your climatic location and the drainage of your soil. Sandier soils may require a slightly longer period as do gardens in hotter locations. Before installing a drip system, talk to the local sprinkler supply dealer to familiarize yourself with the different fittings and emitters. Keep in mind that the one-gallon/hour drip emitter is the workhorse of the lot, so try not to be overwhelmed with the wide array of brands of emitters you are likely to see. Half-inch tubing, one gallon per hour emitters and 1/8″ spaghetti tube (used in limited amounts) are the main components—along with couplings, tees, elbows and caps as needed. Mark the 1/2″ line end-caps with a special stake or marker so the caps can be readily accessed each late spring to quickly flush out the system before the coming dry season usage. Bear in mind that some of the plants can survive with more infrequent watering, while others cannot, but what the drip system is doing, used conservatively every week during the dry season, is keeping the garden soil from becoming “bone-dry” and the resultant plant stresses and leaf loss that will result. The drip irrigation method on the mounds or other similar style plantings should use 90% less water than a pop-up lawn or shrub sprinkler system during the dry season months.
One of the final but most important details to complete the mound project is mulching. To suppress weeds, decrease soil water evaporation, and create a finished look, mulch works wonders. Shredded bark, sawdust shavings or finer wood chips all work well and are available in bags or bulk. Firewood or tree service companies usually have bulk wood chips available at a reasonable price. Sawdust shavings or shredded/ground bark can be purchased at a landscape supply yard. Decide what kind of mulch you want before you order it because aesthetically speaking you will be looking at it quite a bit before the plants grow in.
An 8’x12′ mound will need one cubic yard of mulch for 2-3″ deep coverage over the entire mound. The drip system will be covered with mulch for a more attractive appearance. The emitters still function properly under the mulch.
At this point, your Mediterranean mound should be complete. Accent plants or favorite treasures can always be added and existing plants moved as your tastes change.
Spring and summer planting is appropriate with special attention made to not plant during a heatwave. Good plant growth should occur during the warm months provided the drip system is managed properly.
Autumn is an excellent time to plant, given that the new rain will provide an ideal kind of watering and encourage strong, deep rooting. This in turn will assure good vegetative growth during the warming late winter and spring months, promoting profuse flowering on spring through early summer flowering plants.
Plan a trip to Sierra Azul, enjoy our garden and nursery, talk with the staff, and consider adding to or renovating your garden or lawn.
Jeff Rosendale, owner, Sierra Azul