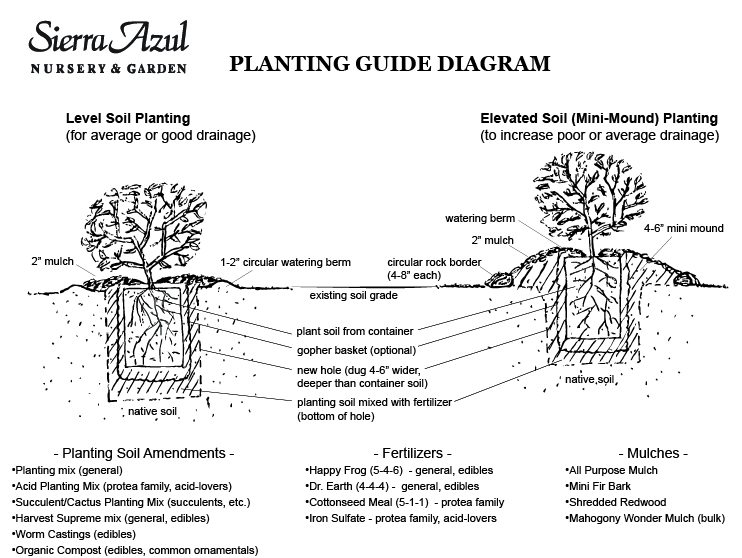
Our Planting Guide Diagram demonstrates two different ways to plant depending on soil type and drainage conditions. See below for detailed steps for Level Soil Planting and Elevated Soil (Mini-Mound) Planting.
Level Soil Planting
For lighter sandy or loamy soils with good drainage, level ground planting is appropriate. Start by digging a hole 4-6” wider and deeper overall than the plant container size. Use soil amendments to create a suitable planting soil mixture (we recommend a ratio between 30:70 and 50:50 of soil amendment to native soil). Mix fertilizer in with the planting soil in the bottom portion of the hole before the plant and/or gopher basket is set in at a rate of one handful of fertilizer for one-gallon, two handfuls for 5-gallon, and 3 handfuls for 15-gallon plants Be sure to compact the planting soil and fertilizer mixture at the bottom so the plant does not sink as the soil settles with watering. If gophers are an issue, we recommend using a heavy-duty basket. Place the basket in the hole, fill in and compact soil (approx. 2”) inside the gopher basket, and place the plant in basket; if properly aligned the basket should be slightly elevated above ground level and the container soil level with ground. When back-filling the hole, particularly when gopher baskets are used, it is important to press the planting soil down the sides of the hole and into the spaces in and around the basket to minimize the possibility of air gaps, which can impede good consistent root growth. It is preferable to apply fertilizer in the planting hole but it can also be scattered around the plant in the watering basin after planting is complete.
Use extra planting soil to form a circular watering berm around the new planting, usually about the same size or a little larger than the plant’s former container diameter. The watering berm is important for keeping the initial hand watering and subsequent hand waterings (if no drip irrigation) from running off and instead allows the water to penetrate directly and deeply into the root zone and below. This is especially important on sloped ground or hillsides. Once planting and watering is complete (and after drip irrigation is installed and checked, if applicable), apply 2-3” of mulch. Make sure to avoid choking out the plant by thinning the mulch right next to the main stems or trunk of the plant. The purpose of the mulch is to insulate the plant’s roots and soil from radiation and water loss and to suppress weeds. It also provides new plantings, gardens, and landscapes with an attractive finished appearance.
Elevated Soil Planting
For heavier clay soils with slow drainage, elevated or mini-mound planting is effective in providing conditions that will help plants that need good drainage (many proteas, aussies, natives, lavenders, etc.) survive and grow well, especially coming out of a wet winter or spring.
The old convention was to dig a deeper hole to provide better drainage and even add gravel, but this actually creates a bigger basin to fill with winter and spring rains which will likely drown and kill the roots as they are trying to grow with rising soil temperatures. Instead, we recommend raising the planting height and digging a shallower hole (see planting diagram), then creating a mini-mound around the plant. This will significantly deter winter and spring rains from overly saturating the delicately growing new roots.
The mound should be fashioned about a foot wider on each side of the new planting. Create a circular border of 4-8” rocks to contain the sides of the mound. Bear in mind the new planting will be elevated 4-6” above the native soil level before the planting soil is filled in the hole and piled up within the rock border to create the mound. Pieces of wood or driftwood can be used for a border as well. Additional planting soil is necessary to make the mound, so an extra bag should be purchased or on hand. See above for guidelines that should also be applied to this type of planting regarding the use of gopher baskets, avoiding air pockets, creating watering basins, and mulching.
Planting Do’s:
- Plants in their containers are well watered soon before planting.
- No air pockets when planting.
- New plantings are well watered very soon after planting and weekly if no drip irrigation:
- (1/2-1gal. water for 1g size, 1-2 gal. water for 5g size, 3-5g water for 15g size)
- Don’t plant before or during a heat wave.
- Mulch new plantings for water retention, weed and erosion control and good looks.
- “Early to bed, early to rise, and don’t forget to mulch you guys.”
Click Here for a Printable Version